Until July 2019, Amazon A+ content was only available to vendors, while sellers may utilise EBC (Amazon Enhanced Brand Content), a minimal contribution that allowed sellers to add more material to their description with a limited number of photographs. Amazon has now made A+ content available to brand-registered sellers. . To make the most of A+ content, one must focus on the best-selling ASINs.
A+ Content combines detailed product descriptions, rich images, charts and narrative copy to help customers make informed buying decisions. Manufacturers’ best contents is provided free in order to increase conversions on detail pages. A+ content is also called as enhanced brand content (EBC). A+ Content feature enables brand owners to change the product descriptions of branded ASINs. Using this tool, you can define your product features in a different way by including a strong brand story, enhanced images, and text placements. When done correctly, adding A+ to your product description pages can result in improved conversion rates, more traffic, and more sales.
A+ content is a premium content option that lets sellers to use rich texts, videos, and graphics to update the product description of their branded ASINs. The goal of integrating enriched multimedia material is to improve the user experience, which leads to more conversions and traffic to the listings. It contains all of the information that a customer would like to know about a product before purchasing it.
Criteria for eligibility
Professional sellers who have been certified as brand owners through the Amazon Brand Registry process, as well as emerging brand owners who are part of select managed to sell programs, such as Launchpad and Amazon Exclusives, are eligible to use this service. You’ll only be allowed to add A+ to products that are part of your authorized brand catalogue once you’ve been approved.
Benefits Of A+ Content
In order to be successful in the Amazon selling a business, you have to take a competitive edge. This is where A+ content (EBC) plays a huge role.
So, here are some advantages to help you understand why A+ content is important.
Grabs a shopper’s attention
Pleases the eye and easier to skim
Brings your product to the limelight
Helps convert better
Better Reviews and Reduced Return Rate
How to Create an A+ Content?
Here is a step-by-step process that explains how to create an Amazon A+ content:
Step 1: Log in to your Seller Central accounts with its correct credentials.
Ensure your brand is registered before proceeding further.
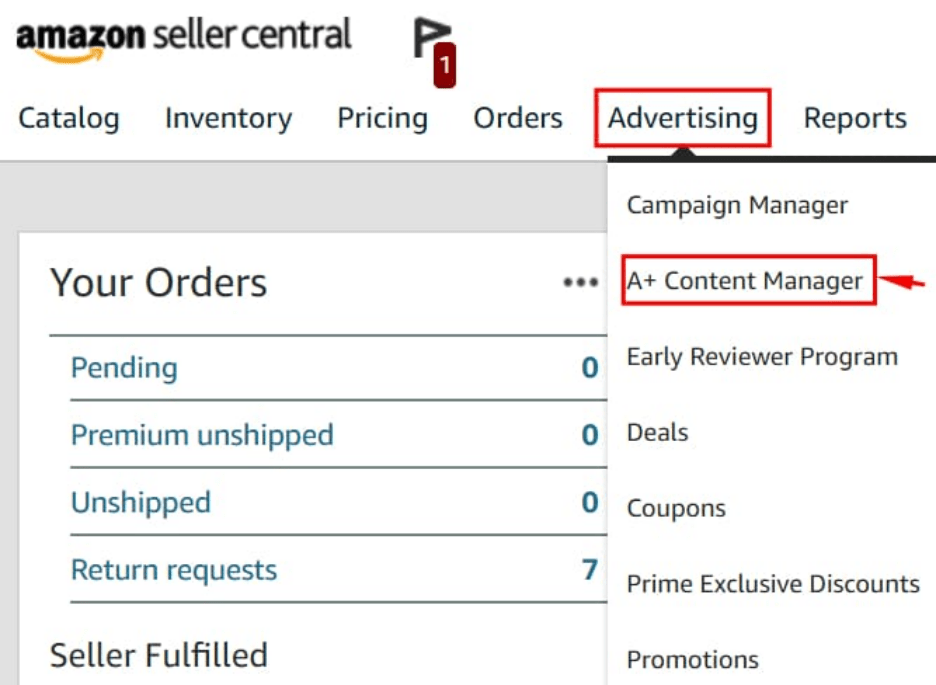
Step 2: Go to Advertising and click on A+ Content Manager

Step 3: In the A+ content manager page, click on Start creating A+ content. Once you click on it, you will find a template which needs to be filled as a part of your A+ content. Self-service modules Amazon builds for you

Step 4: Choose anyone. When you select “Self-service modules,” you will be taken to a screen where you must input the ASIN about which you wish to create content. After that, you’ll see a menu of options for creating modules and layouts.

After selecting the ASIN, you will be prompted to select a BUILD LAYOUT. It’s worth noting that Amazon provides 12 different types of modules, which are divided into the following categories:
Standard(10 options)
Advanced(2 options)
Note that a seller can utilize up to 5 of these 12 modules on his or her product page.
You may use the same modules or mix them up as many times as you like as a vendor. Depending on the time of year, the cost of each package changes. The cart price, on the other hand, is determined by the module type selected by the seller.
Select the continue button when you’re finished. Upload the image as well as the content. To see how your page will look, select the preview option.
To check the pricing information, click the “add to cart” button. Last but not least, purchase your A+ content.
Step 5: If you select “Amazon builds for you,” you will be sent to a screen where you can just submit your text and photographs, and Amazon will do the rest.
Step 6: Give your project a name. Make sure it’s descriptive and relevant enough for you to remember and comprehend.
Step 7: Create a layout and add your content (make sure to zip file for the images). You may preview it before you post it to see how it appears.
Step 8: Click the Finish button if everything seems fine.
Once you fill all the details correctly, Amazon will do a review and make your A+ page live in 7 business days. But if you failed to stick to their guidelines or have done any mistake while creating the A+ content, it will lead to a “rejection.”
CEO @eComManagers
Show Host @eComStoriesWithRaja
Expert Of Amazon & Author
Raja is an Extremely Dynamic Marketer & Consumer Behavior Analyst. He holds a Degree of Consumer Behavior & Marketing from the University of Punjab Pakistan. Along With His Own Amazon Selling Business, he is Also a Consultant & Trainer to the Many Amazon Sellers & Brands. In his Career, Raja Worked in Multiple Organization at Managerial & Leadership Roles. He Helps More Than 140 Amazon Sellers Through His Result Driven Strategies and Tactics.
His Main Area of Expertise Includes Product Hunting, Launching, Ranking, Branding, Marketing, Advertising & Merchandising. Raja Have working Experience on Almost all the Amazon Market Places But Mainly Includes USA, UK, Canada, Germany and India.

